Handmade by Amelia

Handmade by Amelia

There’s nothing like getting a handmade card, especially when you can see how much love and care went into making it!

I got this gorgeous card from my young friend Amelia. She stamps with me every now and then but she made this one on her own and it was a nice surprise to receive it.

Creating with kids takes some patience but worth every second and the rewards come back to practically make your heart burst! Thanks Amelia!

Shirley’s Summer Slush

Shirley’s Summer Slush

Last year my handy hubby Brian made a great frame for me and my crafty friends. He used weathered wood and a metal backing that he sprayed with chalkboard paint so we can use magnets or chalk on it. Each season we make an insert for it. Here’s the latest one we made, which is for summer.

I totally want to go there now! We used the Seasonal Layers thinlets dies, and those Adirondack chairs are calling my name. The drink sitting on the table looks inviting too. It reminds me of the brandy slush my aunt Shirley makes, yum. Everything she makes is delicious! Here’s her famous recipe, in her own handwriting. 💙

I may have spilled some tea on the recipe card while making this, but I think you can read it all. Enjoy!

Debbi

Got scraps?

Got scraps?

Gosh if you’re a paper crafter and you don’t have scraps I’d love to hear your secret. I have a drawer full of scraps and it was overflowing before I decided to try this fun herringbone technique. I used strips of paper that were 1/2 x 6″, 5 different patterns, 2 of each piece. Then adhere in a pattern to achieve this design, pretty simply really!

We made this in class and no 2 cards turned out the same. It was very relaxing to put together, and I have found a solution to use up some of my many scraps, hooray!

Debbi

March Stamp Camp

March Stamp Camp

It’s true, I’m guilty of making more frilly lady cards than masculine guy cards. But this month we used the Nailed It stamp set and Build It framelits from Stampin Up and we made 5 projects that would be great for a guy.

Aren’t these adorable? It just so happens that I have the Best. Guy. Ever. because he’s always building me stuff. The card on the left says “thanks for always building me up”but I will change (up) to (stuff) and he will be getting that card. The tool belt was easy, there’s a similar one in the occasions catalog. Isn’t the measuring tape cute!? It’s a gift box that opens on top. The tool chest was a class favorite, we used the “nuts about you” stamp from Acorny Thank You stamp set. Last, the card on the right was designed by my dear friend Cindy Lee Bee; inside it says you nailed it. So cute!

Here are my measurements for the measuring tape gift box:


Here is how the tool belt came together:

Cutting out all the little shapes sure makes these cards extra special, and fun to give!

Have a “tool-rific” day!

Debbi


Save

Save

Crock Pot Potato Soup

Crock Pot Potato Soup

At our January Stamp Camp we had another yummy soup, this time it was potato soup.  Here’s the quick and easy crock pot recipe, enjoy!

5 pounds of raw potatoes, cubed

1 carton of chicken stock

1 chopped onion

4 stalks of celery, chopped

4 carrots, chopped

1 8 oz brick of cream cheese

1 large can of cream of chicken soup (or 2 small cans)

Put all these ingredients into the crock pot, add a little salt and pepper and maybe garlic salt, and fresh parsley makes a great addition, or dried parsley is good too.

wp-1485465763341.jpg

Cook in crock pot for 8 hours on low, or 4-5 hours on high.  Or, if you are a lucky girl like me and you got an electric pressure cooker for Christmas, it takes only one hour in the pressure cooker and it comes out great!  I like to use a potato masher and mash it up just a little when it’s done, but that’s not necessary.  This soup is amazing served with bacon crumbles, and some buttered Hawaiian rolls, so good.  I hope you give it a try!


Owl be your nurse anytime! 

Owl be your nurse anytime! 

I was recently asked to create a custom birthday card for a nurse, how fun! So I went directly to pinterest to see how to piece together a nurse using the owl builder punch from Stampin up. I found lots of great samples and created this card.

The cute little owl was easy to make, and the fun patterned paper called A Little Foxy designer series paper is just right for the recipient. The nurse’s hat is made from the white belly piece of the owl punch, simply turn it upside down to create the hat. Fun!

It just so happens that I’m playing nurse today too, my husband Brian pulled a muscle in his leg and can’t get around well at all. He’s home from work taking it easy and I get to take care of him. Let’s hope his leg heals fast because he’s getting antsy already!

Have a great day, hope you have time to stamp something.

Debbi

Save

November Stamp Camp – Santa’s Sleigh

November Stamp Camp – Santa’s Sleigh

For our November Stamp Camp, we used the Santa’s Sleigh stamp set from Stampin Up.  It’s on page 24 of the Holiday catalog and it has matching framelits, yay!  We made four great projects together in class and had some yummy chili afterwards.  Here’s what we made:

wp-1480184979895.jpg

We all liked these fun colors together, and the Frosted Sequins were perfect to decorate the tree.

wp-1480184961404.jpg

This one was really quick and easy, and features the new Stitched Shapes Framelits from Stampin Up.  They cut out perfectly with a cool stitching along the edges, I know we will be using them lots more!  This card layout was really simple and would be an easy one to duplicate, you could crank out a lot of these in a hurry.

wp-1480184947767.jpg

I think this card makes a nice Christmas card but it would also make a great guy birthday card.  The framelits that come with the bundle are great, this deer is one of my favorites!  We used copper foil sheets from Stampin Up, and here’s a tip for you to get a smooth die cut when cutting the foil papers…use a new (unscratched) top cutting plate in your Big Shot, or else lay a piece of copy paper over the framelit and foil paper before you put your well used top cutting plate on.  If you use a scratched cutting plate against the foil, there’s a good chance that the scratches will transfer onto the foil paper.  Everyone who picks up this card asks…is that deer metal?  It sure looks like it!

wp-1480184929148.jpg

Our last project was straight out of the Stampin Up catalog, I copied the layout and we created this great home decor item.  The frames were made by my handy hubby Brian, and each one was unique.  The cardstock inside the frame is held on with 2 tiny powerful magnets, hidden behind the snowbanks.  We will switch out the scene seasonally.  These will make great gifts!

November is almost over, and still we have tolerable weather here in Wisconsin with more rain than snow.  It’s wonderful to have this mild weather now, but we will have to pay for it eventually…let’s hope winter is not too harsh!

Have a great day, thanks for visiting with me.  -Debbi

Mom’s Chili

Mom’s Chili

My mom makes the best chili and she was nice enough to come over and help me make chili for our November Stamp Camp.

(For some reason when I make it myself it just doesn’t turn out as good.)

wp-1479269733895.jpg
Here’s how it all came together:

2 pounds hamburger

1 large onion (diced)

3 or 4 stalks celery (diced)

In a large soup pot , brown the hamburger, onion and celery together. Add some salt and pepper, to taste.

Add 2 cans of chili beans, 1 large can of diced tomatoes, a large can of tomato juice, plus about a quart of water. Bring to a boil, stirring often. Now add in her secret ingredient: Mexene chili powder! She uses 1-2 tablespoons, and it’s  just not the same if you use another brand. Last, in a separate pan, boil 2 quarts of water and add 2 cups macaroni noodles.  Cook till tender, drain and add to the pot of deliciousness. Remove from heat and it’s time to eat!

Growing up, whenever we had chili we also had olive loaf sandwiches on buttered white bread, and frosted brownies for dessert. Great memories. Now it’s peanut butter bread with chili, and I should probably skip the brownies.  What’s in your chili??

Thanks again Mom for helping me with the chili, it was delicious!

Fresh eggs

Fresh eggs

In April, we bought six dozen eggs from a farmer in hopes that they were fertile. By the middle of May we were patiently watching the incubator for any sign of action…and we had 61 out of 72 eggs hatch. Pretty good hatching success I’d say!

wp-1477684830068.jpg

We sold some back to the farmer and kept 25 for ourselves. As our barnyard mix of chickens grew, they became friendly enough that they would eat out of our hands and it wasn’t long before I had favorites and named them. They always come running when I bring veggie scraps from the kitchen, and they love to eat our leftover cooked spaghetti noodles.  The hens finally started laying eggs and it’s all come full circle.

20161028_143034.jpg

We may try incubating again next year, but for now these will be delicious!  🙂

Have a great weekend!  -Debbi

Cookie Cutter Christmas Stamp Camp

Cookie Cutter Christmas Stamp Camp

Wow, so many adorable characters are in the Cookie Cutter Christmas stamp set from Stampin Up, it has everything you need to make lots of great cards, or garland, or gift bags, so cute!  It’s so easy to “whip up a batch” of these cuties.  The bundle comes with the matching punch, you will definitely want that too!  Here are the 5 cards we made in stamp camp last week.

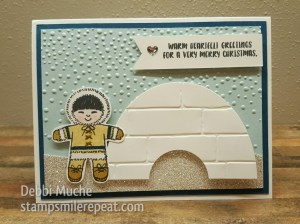
We used 2 different embossing folders to get this look.  Softly Falling folder was used on the background for snow, and the Brick folder was used to create an igloo.  An oval framelit and a circle punch make the job extra easy.  To color the face just the right shade of pink, we used a sponge dauber, dipped it into pink pirouette stamp pad and pressed it onto her face with a twist.  The dauber is just the right size, and creates an even shade that’s just the right color.  Then we used the matching marker to draw on little rosy cheeks.  What a cutie!  Last, we added a bit of Wink of Stella to the edges of her fur coat.

wp-1476740201305.jpg

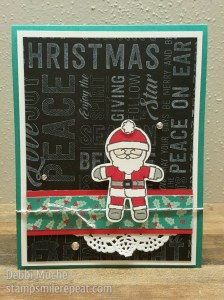
The Merry Medley background stamp from Stampin Up was just right for this card, and I especially like the pop of white ink on black paper for this card.  The Santa was so easy to stamp, color and punch.  We cut the doilies into 4 equal quarters and that seemed like just the right size to tuck under the strip that Santa is standing on.  Oops, I did make one coloring mistake, can you spot it??

wp-1476740242048.jpg

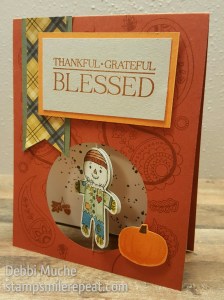
Awwww, this card just makes me happy!  The sweet little scarecrow worked great to make a fall card, but honestly ANY of those adorable characters would work in a spinner card like this.  One tip we found helpful was that if you pull the twine extra taut when adhering (sandwiched between 2 layers of tear tape) then it will hold great.  An added bonus for making this card a little more impressive is to “wind up” the scarecrow before you close the card, then when the receiver opens the card for the first time, he will spin!  How fun!

wp-1476740276145.jpg

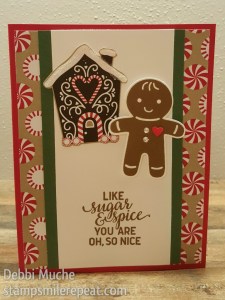
It doesn’t get much simpler than this, you could seriously crank out a bunch of these cards in a hurry.  The gingerbread house is extra easy because all you have to do is cut it out from the Candy Cane Lane designer series paper from Stampin Up.  We added a little glitter to the roof top and chimney, and some bling for his buttons too.  Cute!

wp-1476740293319.jpg

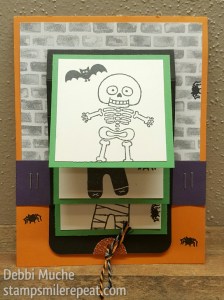
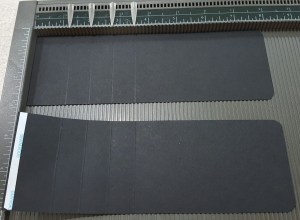
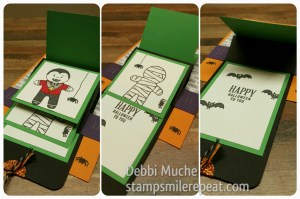
Our last card was this fun Waterfall card, made with the Cookie Cutter Halloween stamp set from Stampin Up.  We haven’t done one of these in class for a while and it worked great because we could use all of the Halloween characters on one card!  Anyone who has been to my classes knows how frugal I am with my paper, I am always trying to get the most out of a sheet of card stock or DSP, so let me tell you the measurements for this card in case you want to try it for yourself.  The base is 4.25 x 5.5″, and the brick designer series paper is from the Halloween Night designer series paper package and it measures 3″ tall and 4″ wide.  This measurement allows you to get enough for 12 backgrounds from just one sheet of 12×12 paper, that helps a lot when making multiples of any card!  The strip of elegant eggplant is 4.25 x 1″, and we stapled it just on the edges so it just matches up to the edge of the brick, no overlapping.  Next is the mechanism to make the waterfall effect work, that piece measures 2.75 x 8″ and we scored it at 1.25 + 2 + 2.75 + 3.5.  Then add tear tape along the shortest edge nearest to the score lines, as shown.

wp-1477337459410.jpg

Hold the tear tape away from you, then fold on all the score lines, away from you.  Line up the edge of the black to the bottom edge of the elegant eggplant as shown, and adhere with the tear tape you already added.  Then tuck the long end under the strip of purple, and wow that was easy!

wp-1477337567958.jpg

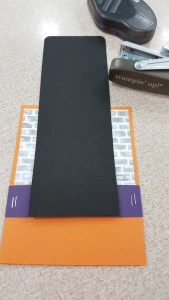
The rest is simple, just layer the squares onto the black strip.  Just a little glue along the back, top edge of the squares!  The layers of squares measure 2.25 x 2.25 in whisper white, and 2.5 x 2.5 in cucumber crush.  The larger layer with the greeting on is 2.25 x 3.25 in white and 2.5 x 3.5 in green.

wp-1477338604446.jpg

What a fun class this was, I thought I knew my favorite card but now I can’t decide.  Which one is your favorite?  If you decide you need these stamp sets, or any of the products we used, just visit my online store here.

 Hope you find time to stamp something today!  -Debbi

PS.  Did you spot the coloring mistake I made on the Santa?  I accidentally colored his belt gray and the buckle black, oops!  It should be the buckle in gray and the belt in black.

Save

Save