Nacho Dip

Nacho Dip

At stamp camp this past week we had some yummy nacho dip. Here’s the easy recipe in case you want to try it. 

2 pounds of hamburger (browned)

2 pounds of Velveeta cheese (cubed) 

1 pint of your favorite salsa (or a quart if you love salsa) 

Put it all in the slow cooker until melted, so easy. We like to eat this dip with tortilla chips or Frito scoops. Enjoy! 

Foxy Friends Stamp Camp

Foxy Friends Stamp Camp

When I first saw the Foxy Friends stamp set from Stampin Up, I loved it and couldn’t wait to play with it.  There are so many cute animals (and people) that can be made with the stamps and matching punch.  There is even a 6×6 paper pack available that matches it.  Here are the 5 projects we made in class together:

20160919_190309-1_wm.jpg

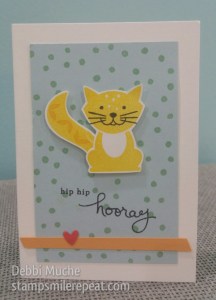
This was quick and easy to make, and who doesn’t love a fuzzy kitty?  To keep it simple, we used the pre-cut and scored notecards, and adding the little heart was just enough to finish this card off.  Inside, it says…”it’s your birthday” with a cake, and kitty tracks.

20160919_190611-1_wm.jpg

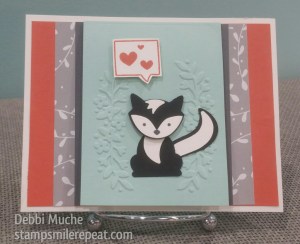
Not much stamping involved for the cute little skunk, just the face.  The pieces were punched out with the punch, then assembled with glue, super easy.  Later, we added a tiny matching flower with a gem to this little skunk either in the hair (for a girl) or on the chest (for a boy).  A little bling goes a long way when you’re dressing up a skunk!  The measurements for this card are 4.25 x 5.5 for the base, and the piece of pool party that “opens” is 3 x 8″, scored at 4″.

20160919_190511-1_wm.jpg

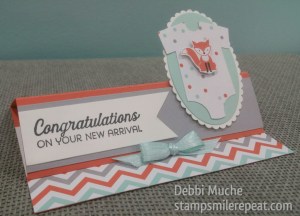
Awww, I can’t get enough of that cute onesie with a tiny fox on it!  The fox is cut from the matching paper pack and it’s a perfect fit to the “baby’s first framelits” outfit.  The fancy fold here was super easy, it’s just a 5.5 x 8.5″ card, scored in horizontal position at 1.5 and 4.25.  The bow helps hold the card stand, plus it’s pretty.  Have you tried making a “fork bow” yet?  They are so easy, you have to try it.  Hint: it helps if you have a “meat fork”.

20160919_191039-1_wm.jpg

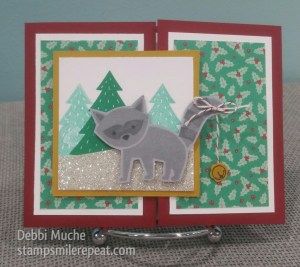
This little critter was begging for a little bell to hang off his tail, so adorable!  Easy fold too, the card is 4.25 x 11, scored at 2.75 and 8.25 to create a “shutter fold” card.  I could have added a real metal jingle bell from Stampin Up to his tail, that would have been cuter yet…but this one won’t require extra postage or a padded envelope.

20160919_190403-1_wm.jpg

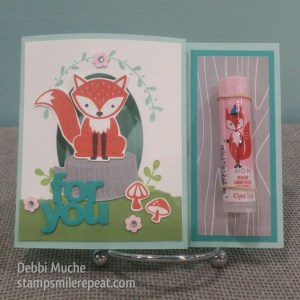
Last but not least, this is a card + a gift!  The little fox lip balms came from Avon, and I designed the card around those colors.  I came up with this fold by accident when I was trying to save paper while making a “box card”.  I call this one a “bowed window card” and it’s fun to make.  The measurements are 4.25 x 11″, scored at 5.5 + 6 + 6.5 + 10 + 10.5.  I cut an oval from the center of the smaller panel, and when you adhere this together, the front window curves outward, which allows the card to stand.  We added a rubber band strung behind the card stock (with holes punched) on the side to hold the lip balm, easy!  We will be sure to use this card layout again in the future, you never know what we’ll come up with.  Other things that might fit there…a pack of gum, a small candy bar, a sucker, lip stick, small perfume, all kinds of goodies!  Hmmm, what else could fit there?

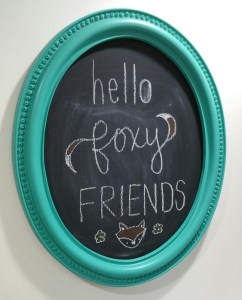
Oops, I almost forgot to share the sign that greeted the ladies who came to stamp with me…and yes, they were all “foxy friends”!

wp-1475003868284.jpg

If you haven’t tried this stamp set and punch yet, they are a lot of fun!  Thanks again to all the ladies who came to stamp with me, it was a fun class!

-Debbi

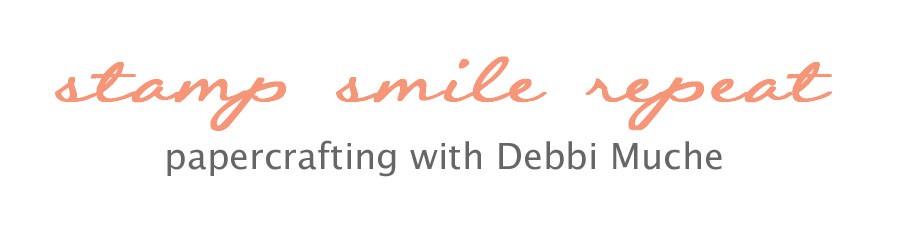
If you don’t already have this Foxy Friends stamp set and punch with the matching paper from Stampin Up, you can order in my online store by clicking the items below, or email me.

Save

Save

Save

Cheesy Broccoli Soup

Cheesy Broccoli Soup

This week in class the weather was rainy and blah, so this homemade cheesy broccoli soup hit the spot!

wp-1474633652873.jpg

In a soup pot, combine:

4 cups water

2 shredded or chopped carrots

3 stalks of celery, chopped

Cook these ingredients till tender, then add:

2 oz.  (1/4 cup) chicken bouillon powder

In a microwave safe bowl, put 2 bags of frozen broccoli pieces, cook for 5 minutes in the microwave, then add to the soup pot.  Cook till tender.

Add a stick of butter

In a separate bowl, combine a quart of half and half with 1/2 cup flour and whisk together.  Slowly add this to the soup and whisk it in.  Whisking it will break up the broccoli too.  Last, add half pound of Velveeta cheese and let it melt in.  This recipe makes about a gallon of delicious soup!

Save

Clearance!

Clearance!

clearance

Wow, Stampin Up just updated the Clearance Rack and there are many good deals to be had!  Up to 60% off, yes please!!  Here are a few of my favorites:

ppribbon

Pumpkin Pie 1/4″ Cotton Ribbon – only $2.40

lbstack

Love Blossoms 6×6 paper stack – only $3.20

poolribbon

Pool Party Glitter Ribbon – only $2.20 !!  This ribbon is amazing!!

perpcal

Perpetual Birthday Calendar – only $6.40

To see the rest of the goodies on Clearance, click HERE.

But don’t dilly dally, these deals won’t last too long and I expect them to sell out fast!!

-Debbi


Jolly Friends

Jolly Friends

In class this past week we made this fun Christmas card using the Jolly Friends stamp set and the Cable Knit embossing folder.  The folder is thicker than all of our other embossing folders so you only need to use one plastic plate when running it through the Big Shot machine.  To appreciate the 3D-ness of the design, you really have to feel it with your own 2 hands, it’s unlike any other folder we have.  I hope that Stampin Up will create more of these great folders for us.  We will be sure to use this one again soon.

wp-1473704297271.jpg

Have you started your Christmas cards yet?  We make one in each card class after Mother’s Day.  Stamp a stack with Christmas cards coming soon too!

-Debbi


Swirly Birds – wedding card and gift box

Swirly Birds – wedding card and gift box

You can’t go wrong with the swirly bird stamp set and matching framelits!  Here’s one of my favorite cards using the versatile set.  Just stamp the solid and line swirls and leaves on white shimmer paper, then spritz with water to create the watercolor look. The more water you add the more the ink spreads or “bleeds”.

We didn’t spray the inside, here’s what it looks like. Clean and neat if you prefer that look.

20160722_144133-1_wm.jpg

We also made a matching gift box.  This box was made from a single sheet of 8.5 x 11 card stock and is just the right size to hold a set of greeting cards.

20160722_144250-1_wm.jpg

Have yourself a great day, hope you find time to stamp something!

Debbi

#imbringingbirthdaysback – Thanks Shannon!

#imbringingbirthdaysback – Thanks Shannon!

Yippee!  I got a great card in the mail for my birthday from Shannon West.  She’s one of my very favorite Stampin Up heroes and she is doing something amazing…she offered to send a birthday card to anyone who cared to receive one.  Wow!  I’m sure she wasn’t expecting the kind of response she got, because she has begun a whole card sending movement!  Here’s the awesome card she sent to me.

20160412_170331.jpgSee the words on the back of the envelope?  That’s her own personal carved stamp she created.  It was such a hit that Stampin Up has decided to reproduce it and offer it to our customers, yay!  So you too, can jump on the birthday bandwagon and get your own #imbringingbirthdaysback rubber stamp too.

143573SJust click on the words and you’ll land at my Stampin Up shopping page and you can order one for yourself.  How many birthday cards do you receive each year on your birthday?  I know I love each and every one I get…so I’m on a mission to send more cards too!  I bet Shannon will get a mailbox full this year!

My birthday was a little more special because of her thoughtfulness, thanks Shannon!

-Debbi

Mojo Monday #443

Mojo Monday #443

Hey, happy Monday!  I had a great weekend and I’m off to a pretty good start to this week so far.  Today I’m giving Mojo Monday a  try; they come up with a fun card sketch and we can create a card with their layout.  Here’s my first attempt, this is card sketch challenge #443, hope you like it!

20160411_101711-1_wm.jpgHave a great Monday!

-Debbi

Minion Punch Art

Minion Punch Art

Although I couldn’t find an official definition for “punch art”…here’s what it means to me:  To use various shaped punches in an attempt to assemble a character or object.  Or basically, making something cool out of basic shapes!  In March, our Stampin Up Stamp Camp was all about punch art.  We made 5 projects; 4 cards and a cute barn box with a cow and chickens on it.  Here’s the minion card we made, isn’t he cute!?!20160318_162804-1_wm.jpg

Super simple to create too.  There are lots of different ideas for minions out there, I found one like this on pinterest, originally created by Kelly Kent.  Here’s how we made our version…all Stampin Up products, of course!  The card is 4.25 x 11, folded at 5.5″ to create a top fold card.  The minion’s clothes measure 3.75 x 2.”, and the straps are punched with the word window punch and squared off on one end.  The goggle straps are 1″ square, snipped in half and the eyes are 1″ circle punch, 3/4″ circle punch, and the black centers are the largest circles on the owl builder punch.  Same punch for the buttons on his clothing strap.  Corner rounder punch for the top of the clothes and the top of the card. The letters are from the Little Letters Thinlits Dies.  Not a punch but too cute not to use them here!

A little tip for punching the frames for the goggles:  always punch the smaller circle first so you can then center the larger punch around the smaller circle.  If you punch the bigger circle first, you’ll have a hard time punching the smaller circle just right.  Don’t ask me how I know that!  We used 2″ and 1.5″ circles here and silver foil.

20160321_121839-1.jpg

His smug little smile was made from the extra large oval punch.  Punch out just a sliver at a time to get a skinny smile.  Other things you could use this punching technique for might be spider legs, hair, eyelashes, or a flower stem.

20160321_121542-1.jpg

Inside this adorable  card, the greeting says “woo hoo! put your party pants on”.  It makes me smile every time I open this card!  These  stamps are from the Stampin Up Sale-a-bration offerings, available only till the end of March 2016.  Here’s what the set looks like, and you can get it FREE with a $50 order.

partypants

Now…to find a kid named Jake who has a birthday coming up!

-Debbi

Bessie’s Barn Box

Bessie’s Barn Box

20160318_161947-1_wm.jpg

Our March Stampin Up stamp camp was so much fun, we did punch art!  I had been promising a punch art class for a long time and once I got started, I didn’t want to stop.  We made 5 projects, and this was my favorite!  Momma chicken is on one side, with Bessie the cow looking out one end of the barn.

20160318_161044-1_wm.jpg

The other side panel has the baby chicks looking for their momma.

20160318_161507-1_wm.jpg

The back end of the barn is the fun part.  My husband Brian was in my stamping studio with me as I was creating this project and he thought the cow needed a back end, so I designed the “udder end” (hee hee) to match.

20160318_161524-1_wm.jpg

As I was working on this part, I tried lots of different Stampin Up punches (and a few dies too).  I experimented with different shapes and sizes and got the help of my farming friends to help me decide what looked right, and this is what we came up with. (it was quite the cow-laboration, no bull!) Her little tail is from the Playful Pals stamp set, and the cow spots are a cloud stamp from the Balloon Celebration set, both available through May 31 in the Stampin Up 2016 Occasions catalog. They were just right for this project.

20160318_161547-1_wm.jpg

These barnyard friends are raising the roof to make room for treats like milk duds, chiclets gum, milky way candy bars, oreo cookies, skinny cow cheese snacks, marshmallow peeps, chick-o-stick  candies, tootsie rolls, cow pie candies, mint patties, or cow tales candies.  You could also fit a Dairy Queen gift card inside, I love their Moo-Lattes!  What would you put in this cute box?

The shape of the barn was adapted from “Pootles” pentagonal treasure chest keepsake box, and the paper, dies and punches are all from Stampin Up.  To make the cow head, I used the following punches:  large oval, extra-large oval, acorn builder, eyes are from the owl builder, horns are the bird from the tree builder, and ears are from the festive flower builder punch.  The little chicks are made from 3/4″ circle, 7/8″ scallop circle, and the heart from the owl builder punch.  Momma chicken is made from extra-large oval snipped in half, 1″ circle, 7/8″ scallop circle, the tail is the smallest flower from the blossom bunch punch, and the beak is the star from the Itty Bitty accents punch pack.  Bessy’s Back end is an oval framelit die, the udder is an extra-large oval, legs are word window punch, the tail is from pyramid pals thinlits dies, and the teats are from the festive flower builder punch.  The hooves are a strip of 1/4″ card stock, snipped to the right size as needed.

 I will be sure to share the other projects we made in this class soon, “heifer” nice day!

-Debbi